User Tools
Sidebar
Table of Contents
Advtrains Tutorial
The usage namespace hosts the draft for a tutorial about the advtrains mod. It is designed, to be simple, concise and complete. Feel free to edit this page if you want!
 This is a draft. Please improve this page by creating relevant pages, adding information and references to internal or external sources.
Note: this tutorial has been written for Advtrains 2.0.1 TSS and Minetest 5.1.0. Examples and practices described in this page don't take advantage of improvements introduced in later releases.
Getting started
To get started with Advtrains, first craft a rail block:
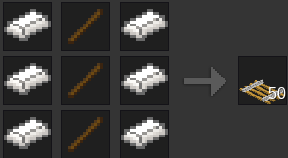
Or if you are in the creative inventory, search for “track” or use the command (requires the give privilege):
/giveme advtrains:dtrack_placer
Then you can place a rail at a position and another next to it. You just created your first railway track!
It is possible to make 30-degree, 45-degree or 60-degree turns. There are examples of how to achieve this:
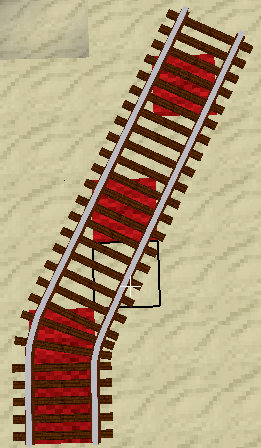
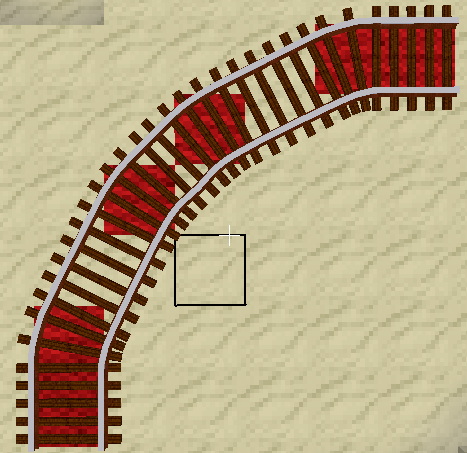
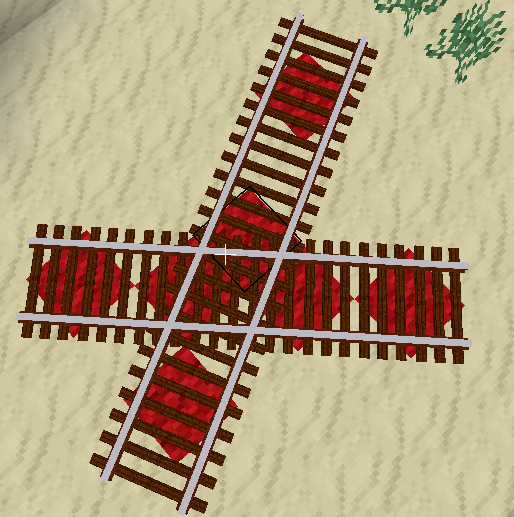
A rail node has been placed only at the red marked places. The first image shows that 30-degree angled rails use a knight's move (2 ahead, 1 aside) for placement.
You must have the track_builder privilege to build tracks. Advtrains should give it automatically in single player mode. If not, you can grant it using:/grantme track_builder
Switches
Main articles: Switch, Trackworker
A switch is a rail node which diverges into two separate tracks. To create switches we need the trackworker tool. Craft it:
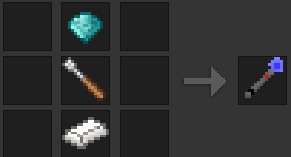
Or if you are in the creative inventory, search for “trackworker” or use the command (requires the give privilege):
/giveme advtrains:trackworker
Here is the steps to create a switch:
- Place the rail which should be the switch.
- Select the trackworker tool.
- Left-click the switch 1-2 times. A switch should have been created.
Sometimes the switch might need to be rotated:
- Right-click the switch. This will rotate the rail node every 30 degrees.
- Repeat the above step until the switch matches perfectly the railway tracks.
When you finished it should look like this:
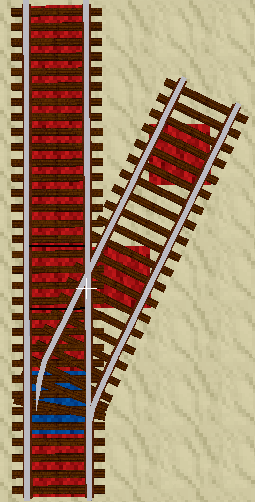
The rail above the blue marker is the switch. Otherwise, rails are placed only above red markers. Right click the switch (without the trackworker) to toggle it.
There are also Y-turnouts and 3-way turnouts. These turnouts have their own placers.
Rail crossings
There are currently three types of crossings tracks with their corresponding placers:
- Perpendicular diamond crossings: crossings where the two tracks are perpendicular to each other
- 90+Angle diamond crossings: crossings where one of the two tracks is parallel to the X or Z-axis
- Diagonal diamond crossings: other crossings that do not fit into the categories listed above
Note that currently there are only crossings for two tracks, and certain shallow crossings are not available.
Additionally, crossing rails can be created by placing opposite 45-degree rails:
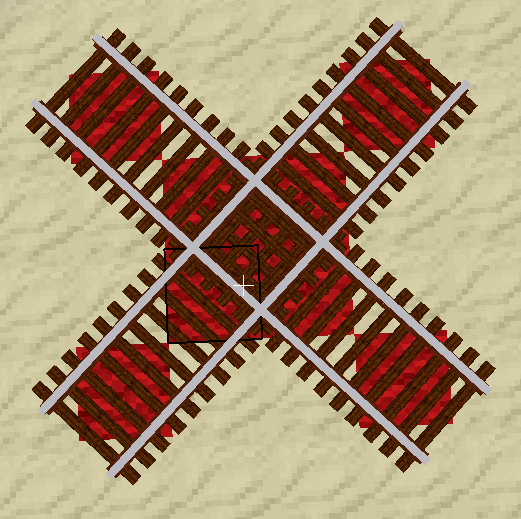
or by using the knight's move as described in the previous section:
Master height differences!
Main article: Track slope
Height differences are frequent, and it's important to master them. It's why there is the “Track Slope” node.
It is crafted using the following recipe:
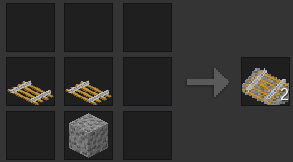
To use the newly crafted slope:
- Prepare the base (where the slope will end).
- Head up the direction of ascent.
- Point to the slope start.
- Place the slope.
It will look like this:
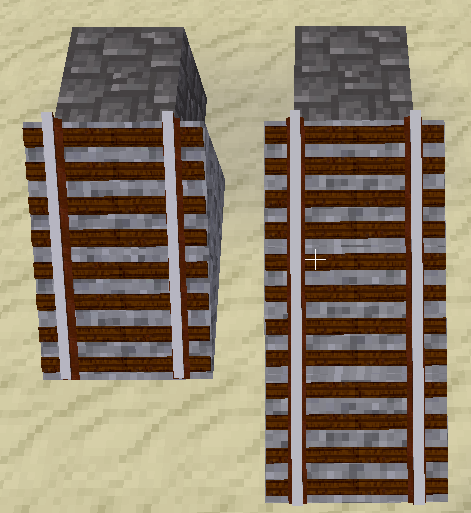
Other nodes
Note: bumpers and detector rails aren't aligned to the regular tracks. They cannot also be part of a curve or a switch using the Trackworker.
Bumpers
Main article: Bumper
Bumpers are usually placed at the end of a track, to prevent trains from rolling off it. They are crafted as follows:
It is crafted using the following recipe:
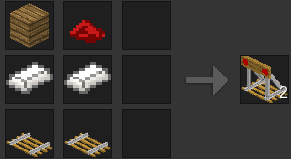
The bumper may be rotated with the Trackworker.
Signals
Main article: Signal
Signals indicate if trains may pass or not. They may also be rotated by the Trackworker. There are analog signals and electric signals. They are crafted as follows:
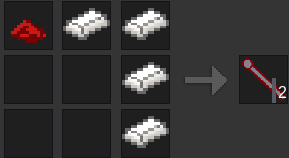
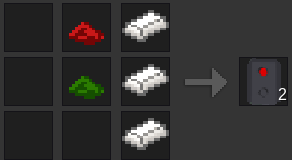
Right-click (or double tap on Android) the signal or power it with a mesecons signal to turn it green. To change to red again, right-click a second time or discard the mesecons signal.
Used as-is, the signals can only signal the driver; they don't have any effect on trains. Press shift+e whilst right-clicking on the signal to set an influence point. You then punch the rail just before the signal, whilst looking in the driving direction.
Platforms
Main article: Platform
Platforms indicate where passengers should get on the train. There are low and high platforms:
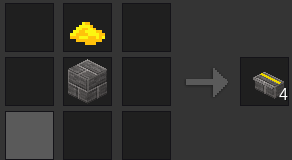
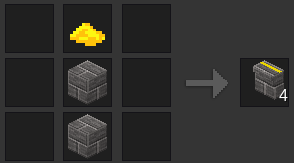
and also diagonal platforms that can be high or low - the high platform recipe is shapeless:
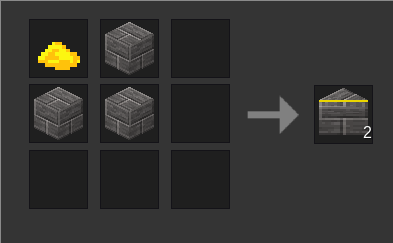
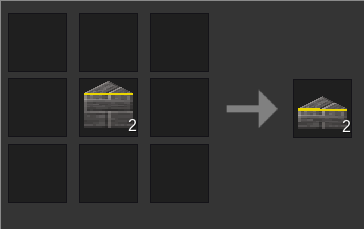
When a player is standing near the platform edge and a train stops with its doors open at the platform, players board the train automatically. This does not work for diagonal platforms yet.
There is a variant, crafted with sandstone instead of stone, included in the modpack. However, more and more platforms are included in this Minetest mod. You can also create your own.
You might want to use low platforms when possible, as they align better with the floor of many trains. However, you might want to use high platforms for heavy rail and low platforms for light rail.
Detector rail
Main article: Detector rail
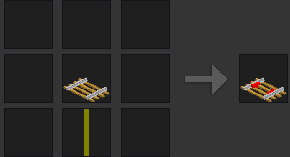
Detector rails turn adjacent mesecons on when a train is standing/driving over them. They can be used with Mesecon Torches.
Trains
Main article: Trains
Train overview
The most important part of this mod are trains. There are some which you are assumed to have, but community members made more trains:
- https://github.com/mbblp/advanced-trains-website/blob/master/trainhub/index.html (original link in the forum post is broken)
Trains are usually composed of engines and wagons.
Explaining in detail capabilities of each wagon would be off-topic for this page, but there's an overview of how to use them:
- Craft the wagon (there are per-wagon explanations on how to achieve this).
- Place the wagon on a track. The track should be long enough or a notice message will be displayed.
- Once you finished with the wagon, punch it to destroy it.
- Only the player who placed the wagon may destroy it.
- You will need to hold the Sneak key while left-clicking the wagon.
- If you destroy a train, you will only get in return 4 steel blocks, so think twice before doing it.
Driving trains
Right-click (or double tap on Android) the train to get on. This will attach you to the wagon and register you as passenger. Depending on how the wagon is set up, you are either in a passenger seat or inside a driver stand. Right-clicking again will show your possibilities on what you can do in/with the wagon.
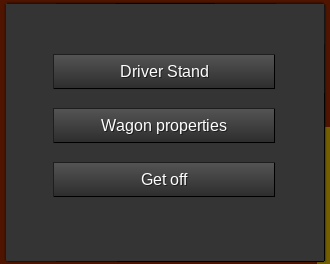
When entering a subway wagon, for example, you are in the passenger area. You can see this by the fact that there’s no head-up display. Right-clicking brings up the form above.
- The first button will make you move to the driver stand, so you can drive the train.
- You must have the
train_operatorprivilege to drive trains. Advtrains should give it automatically in single player mode. If not, you can grant it using:/grantme train_operator
- Some trains require the doors to be open to change to Driver stand.
- The second button should say “Wagon properties” and appears only for the wagon owner. As of time of writing this allows to set whichever players are allowed to drive the train.
- The third button shows “Get off”. Click on this button to get off the train. When the doors are closed, it says “(Doors closed)” and you can't get off the train.
- You can bypass this by holding the Sneak key and then displaying the formspec to get off. If the train is travelling fast, this may result in health lost.
The Japanese and subway train support automatic getting on by walking towards a door, while standing on a close platform. As well, pressing W or S while in the passenger area will make you get off.
Train controls
When you are inside a driving stand, you are presented with a head-up display, like this:
 [F] {B - >o< +} >|< >|<
Speed: |++++___________|> 15 km/h
Manual operation
(See Train HUD for more information about the display.)
The [F] shows whether the train is driving forward or in reverse direction.
The upper bar is the train's current speed. The lower bar normally says “Manual operation” - that means the train is controlled by a train driver(you).
It might also show an “ATC” bar, in which case the train is in “Automatic Mode” and will always try to reach and hold the speed shown. This mode is activated when the train receives an ATC command or you enter a “set speed” key combination. You can then switch back to manual mode by pressing the “Brake” key once.
Assuming you have the default controls, the following key bindings apply:
- W: faster
- S: slower
- A/D: open and close left/right doors
- Space: brake (shown by >B<, switches to “manual operation”)
- Sneak+S: set speed to 0 (brake to stop!)
- Sneak+A: set speed to 4 (~ 15 km/h)
- Sneak+D: set speed to 8 (~ 30 km/h)
- Sneak+W: set full speed
- Sneak+Space: Show the Onboard Computer
- Sneak+E: Exit the train
Coupling wagons
You just learned how to drive an engine. Now place a wagon anywhere and drive your engine slowly towards that wagon. As soon as they collided your engine will stop. Now get off and right-click the icon that appeared between the engine and the train. You have coupled the wagon to the engine.
You can also go to the driver stand, enter the onboard computer, and click the appropriate buttons to couple wagons to the engine.
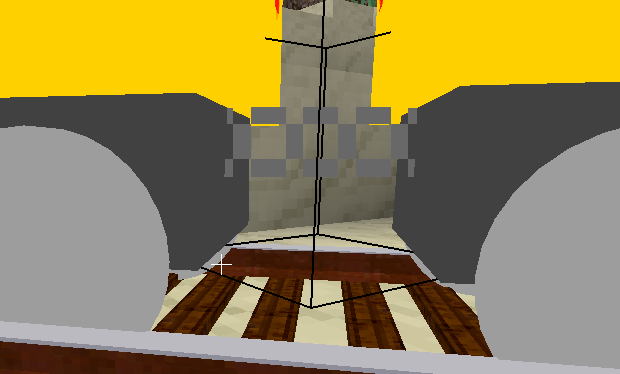
To decouple wagons, click on the icon again.
That was the end of this tutorial.
You can now build railway tracks, drive trains and do many amazing things! To continue on, you can see this advanced guide.
License
All content belongs to Maxime Launois. Unless otherwise noted otherwise, any text, image or other content is licensed under the Creative Commons Attribution-ShareAlike 4.0 International License.

